Tesla Dumpbox Install Instructions
Thank you for the purchase of the dumpbox for your tesla! These install instructions will be using the Plaid as a basis, but the installs for all other cars are essentially the same except for some small changes, which will be discussed in the installation instructions below. The tools required for your dumpbox install (at least on the plaid) were a 10mm and an Allen for 21+ cars that require the 12V tap in kit (Included). Everything else for install is included! Before you do anything, put the car in jack mode. To utilize the dumpbox on Tesla's the car has to be in jack mode while the dumpbox is in use (aired out). Tesla's do not “shut off” unlike traditional cars, so this is how you keep the car aired out while its in “show mode”. To raise the car back up you simply remove it from jack mode and the car will automatically raise!
Install:
Put the car in jack mode
Put the car in jack mode
Open Frunk
Remove all frunk plastics

Remove Rubber grommet around frunk liner

.
Remove the fabric liner (have to remove the light, it just snaps out)
.

.
Remove the 4 10mm Bolts holding the frunk tub in place.
.

.
Now that you have the tub removed, the difference on the install is if you have a pre 21 or post 21 car. Pre 21 cars have a traditional battery, what you will do is use the harness and tap directly into the positive and negative of the battery with the supplied harness. Post 21 Cars will use the supplied Terminal to Tap into the post that's inline with the new battery (2 allens). The tap slides over the mount and uses a set screw to lock it into place.
.
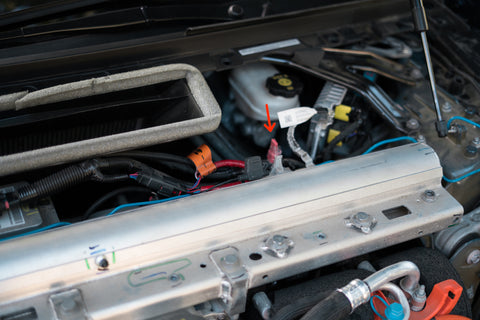
.
We installed the negative on the negative ground of the tank. Pre 21 cars just go to the negative terminal of the battery.
.

.
Now that you have the positive and negative hooked up, plug the harness into the dumpbox to verify you hear a click when you press the button. The dumpbox will only work when you hold the button on the remote. It will automatically close when you release the button.
Once verified, you will now use the supplied cutters and cut the 4 corner airlines. On the Plaid the lines ran alongside the air tank and were yellow, blue, and two blacks. If you're unsure which lines you need to cut, the plaid has the air manifold underneath the passenger headlight. If you look on the manifold it will say FL,FR,RL,RR. You will tap into those. For the pre 21's the manifold is underneath the frunk tub, just double check you are tapping into the 4 corner airlines. Use the supplied T connectors and push them down on the airlines and give a small pull to verify the locking collar has locked onto the airline.
.

.
After you have done that you will figure out a location to install your dumpbox. Everybody so far has installed them in the frunk tub (you will need a drill bit for this step if that is the route you want to go). You will route the airlines and the harness to the location of your choosing that the dumpbox is located. We installed it on the front of the tub along the wall. Whatever you do, just make sure the airlines are not pinched and go into the fittings on the dumpbox straight.
.

.
That completes the install for your dumpbox! Now you will double check your work and make sure no airlines are leaking. To do so, turn off jack mode and let your car air up. Take some soapy water and spray your fittings of all the connectors you attached airlines to and make sure they do not bubble! If all is good you can reassemble the frunk!
.

To airout:
Turn jack mode on
Hold A button on remote to airout
Release A button once aired out
To airup:
Turn jack mode OFF
Turn jack mode OFF